
The call we get most often about line inspection goes something like this. Someone has a route, maybe 5km, maybe 40km, and they’ve tried it with a small camera drone. It works, sort of, except they’re landing every twelve minutes and they’ve come back with shaky video they can’t read. The aircraft wasn’t the problem. The set-up was.
Quick answer: Line inspection is a slow-hover job, so the airframe is picked around endurance rather than payload: a good inspection gimbal plus camera is only 0.8kg to 1.5kg, which is noise on a 12kg airframe. Most failed attempts fail on 12-minute sorties and shaky video nobody can read, not on the aircraft. Plan 20-35 minute sorties, keep a safe stand-off and let the lens do the reading, with the C12 for thermal work and the C20 when you need detail from a distance. Size the pack for the windy route rather than the calm one, and balance the props, because thermal video is unforgiving of vibration. See our thermal configuration guide and the heavy-lift motor guide.
| Item | Reference figure | Why it matters |
|---|---|---|
| Gimbal plus camera | 0.8-1.5 kg | Light enough that payload is not the endurance problem |
| Sortie length | 20-35 minutes | Covers useful line between landings |
| Stand-off | Use the zoom, stay back | Reads a fitting without risk |
| Pack sizing | Cover the windy route | Hover in a breeze draws more than the calm plan |
| Propellers | Balanced, low vibration | Keeps thermal frames readable |
| Gimbal choice | C12 thermal, C20 zoom | Thermal finds faults, zoom reads detail |
Line inspection is a specific job. You fly slowly along a conductor, hover now and then to look closely at a joint, and you want to finish the route in one sortie if you can. Payload is light. Time and stability are everything.
Thermal is usually the lead sensor
If you’re looking at insulators, clamps, joints or transformers, thermal is what finds the fault. A loose connection runs hotter than the conductor around it, and you can see that in a thermal image while everything still looks perfectly fine to the eye. Visible light is useful for spotting physical damage, broken strands, bird nests, damaged fittings, but it won’t tell you something is about to fail.
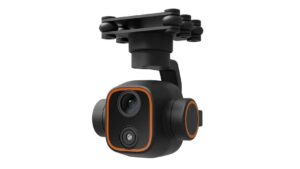
So a serious line-inspection payload is a thermal core plus a zoom camera, on a stabilised gimbal. The zoom lets you read a fitting from a safe distance, and the safety distance matters when you’re anywhere near live conductors. We compare the two sensor types, and when you actually need both, in thermal vs zoom gimbal cameras.
What the payload weighs, honestly
A good inspection gimbal plus camera is around 0.8kg to 1.5kg. That’s light. On a 12kg airframe it’s noise. Don’t let it distract you, because it isn’t what ends the flight. What ends the flight is hover current multiplied by minutes.
We ship gimbals like the C12 thermal gimbal for thermal work and the C20 zoom gimbal when you need to read detail from a distance. If you’re building the payload around a lighter frame, the C01Pro stabilised gimbal is the compact option. The avionics side of this, downlink and control included, is in the avionics guide.
The endurance maths, without the fluff
Flight time is pack energy divided by the power the aircraft draws, and at a slow inspection hover the draw is close to the minimum the machine ever uses. That’s the good news. The bad news is wind. Hovering in a 20km/h headwind to hold position along a line costs noticeably more current than still air, and the pack has to cover the windy case, not the calm one.
The rule we use: estimate hover current from the thrust table at your cell count, multiply the minutes you need by roughly 1.2 for wind and repositioning, then pick a pack with that capacity plus a 20 percent reserve. The full version of this calculation, and how C-rating fits in, is in the UAV battery guide.
Propulsion for a slow, steady hover
You want the aircraft to sit still, quietly, for a long time. That argues for a mid KV motor with a relatively large, slow-turning propeller, running near its efficient point. It is the opposite of a racing set-up, and it is the opposite of a heavy-lift set-up too. Choose efficiency at hover, not peak thrust.
If you’re picking lift motors for a frame like this, multi-rotor UAV motors covers the range, and the reasoning behind KV versus prop size is in the propulsion guide. Keep the props clean and balanced, by the way. Vibration shows up as blur in a thermal image just as badly as in visible light.
Wind, height and the boring safety bits
A conductor is a small target in a big sky, and you’re working near live equipment. Two things keep that manageable. First, fly from a position where a failure doesn’t put the aircraft near the conductor, and use the zoom rather than getting closer. Second, respect the wind, because a gust on a hovering aircraft is a position error you didn’t plan for. Battery margin is your friend here. A 20 percent reserve is not optional on this kind of work.
Plan the route around the aircraft, not the other way
Before you buy anything, sketch the route and count the stops. If there are thirty towers and you hover for a minute at each one, that’s thirty minutes of inspection before you’ve flown a metre between them. Add the transit time and you’ll see whether one sortie is realistic or whether you’re planning two. This is the step people skip, and it’s the one that decides whether the aircraft you buy can actually do the job.
Then think about where you’ll launch from. Line inspection often happens in places with no clean landing spot, so the launch point shapes how far you can range. It also shapes your reserve, because you want enough pack to get home from the furthest point, not just to reach it. Build the route, then size the pack to it. Not the other way round.
One more practical point. On long, thin routes, a small tailwind outbound becomes a headwind on the way home, and that’s when the pack empties fastest. If the route runs upwind and downwind, plan the whole thing around the return leg, because that’s the one that bites.
Putting a route-capable machine together
The recipe is fairly consistent. A stable multirotor, mid KV motors, large props, a pack sized for the whole route with wind margin, and a stabilised thermal plus zoom gimbal with a reliable downlink. If you want the endurance side of the other inspection route, the same logic runs through thermal inspection configurations, and if you’d rather start from the application overview, that’s the UAV applications guide.
Frequently asked questions
How long should a line-inspection sortie be?
Long enough to matter, usually 20 to 35 minutes. If the route cannot fit in one sortie, plan the landing points rather than pushing the pack.
Do I really need thermal, or is a zoom camera enough?
Zoom alone works for finding physical damage. Thermal is what catches a fault before it fails, so for maintenance work you want both, which is the comparison in our gimbal comparison guide.
How close do I need to fly?
Use the zoom and stay back. A safe stand-off plus a long lens reads a fitting better than getting close, and it keeps you and the aircraft out of trouble.
Why is my flight time short even with a light payload?
Wind and hovering. A slow hover in a breeze draws more than you think, and the pack needs to cover the windy route, not the calm one. Pack sizing is in our battery sizing guide.
Will the propellers matter for image quality?
They will, through vibration. Balanced props and a well-damped gimbal keep the thermal image sharp, which is the difference between a readable frame and a smear.
Tell us the route length, the wind you work in and the payload, and we will size the propulsion and pack to finish the line in one pass. The range is on our motor page, with gimbals under Skydroid accessories.